Archive for May, 2023

May 23

Banana Bread Overnight Oats

Ingredients

  • ripe banana 
  • 1/2 cup almond milk (or any other preferred milk) 
  • 1/4 cup nonfat or low-fat plain Greek yogurt (or part-skim ricotta cheese or whipped cottage cheese) 
  • 1/2 teaspoon vanilla extract 
  • 1/2 cup old-fashioned rolled oats 
  • tablespoon chia seeds or ground flaxseeds (aka flaxseed meal) 
  • 1/4 teaspoon ground cinnamon 
  • pinch salt
  • 1-2 teaspoons maple syrup or honey (optional) 
  • 1-2 tablespoons toasted, chopped pecans (optional) 

While oatmeal is typically eaten warm, this type is eaten cold, straight out of the fridge. It reminds me of an indulgent chilled porridge, and this rendition features energizing ingredients and a satisfying, dessert-like flavor. It’s super creamy and has all the cozy feels of banana bread. It takes about three hours to set, but because it’s so convenient to prep the night before, we usually let it sit overnight, hence the name. I find it’s a perfect remedy for hectic morning meals.

JOYFUL NOTE: The riper the banana you use, the sweeter it’ll be, and the easier it is to mash. If your banana is firm, you can peel it, slice it up and microwave it for about 20 seconds to soften (it’ll blend more seamlessly into the other ingredients). If you’re adding toasted pecans, wait until right before serving or they’ll soften up if they sit in the oat mixture overnight. Also, while I personally think this is sweet enough without adding honey or maple syrup, feel free to mix in 1 to 2 teaspoons if needed. And if you love blueberries, give my Blueberry Muffin Overnight Oats a try!

Preparation

In a small mixing bowl, mash the banana with the milk, yogurt and vanilla extract until well-blended. Mix in the oats, chia seeds (or ground flaxseed), cinnamon, salt and the maple syrup, if using. Stir until everything is mixed together.

Transfer to a small mason jar or pretty container with a lid, cover and stash in the fridge for at least 3 hours to overnight. Right before eating, add toasted pecans, if using, and dig in!

This will keep in the fridge for up to 2 days.
0
comments

May 23

Flourless Protein Brownies

MAKES: 9


INGREDIENTS:

  • • 3 ripe bananas, peeled and mashed
  • • ½ cup creamy peanut butter (or other nut butter)
  • • 1 large egg, room temperature
  • • ½ cup chocolate protein powder
  • • ¼ cup cocoa powder
PREPARATION:Liberally coat an 8-inch square baking dish with oil spray and set aside. Preheat oven to 350 degrees.

In a mixing bowl, mash the banana and stir in the peanut butter until smooth, but it’s okay to have lumps of banana throughout. Add in the egg. Stir in the chocolate protein powder and cocoa powder, and blend until the ingredients are well-combined and creamy.

Add batter to the prepared baking dish, smooth with a spatula or spoon to evenly distribute, and tap on counter a few times to set. Bake in the oven on middle rack for about 25 minutes. Remove and let cool on counter for at least 10 minutes. Slice into 9 squares and enjoy!

Store in an airtight container on the counter for 3 to 4 days or in the fridge for up to a week. You can also freeze them: Wrap individual brownies in plastic wrap and a second layer of foil. Place in an airtight container or zip-top bag. When you’re ready to enjoy one, allow brownie to defrost on a plate at room temp or microwave for 10 to 15 seconds on low.

0
comments

May 23

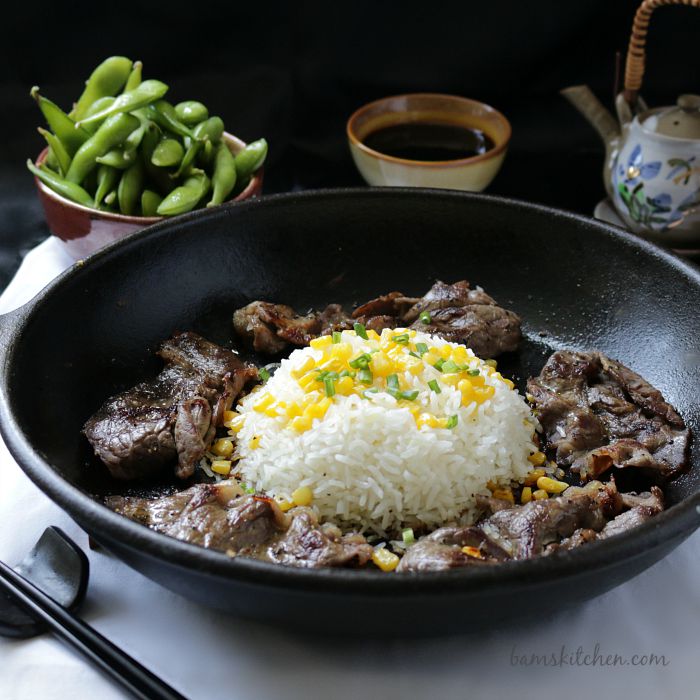
Pepper Lunch Steak and Rice Sizzle

Bowl of pepper beef with a mound of rice with corn and green onions on top.

SERVES: 4

Ingredients

Amakuchi (Honey – Soy Sauce)

  • ¼ cup honey
  • ¼ cup tamari (soy) sauce
  • ¼ cup oyster sauce
  • 2 tablespoon water

Karakuchi (Garlic-Soy Sauce)

  • 1 teaspoon canola oil
  • 3 cloves garlic peeled and minced
  • ½ cup tamari (soy) sauce
  • ½ teaspoon black pepper ground
  • ¼ cup water
  • 1 teaspoon cornstarch

Pepper Lunch Beef (serves 4)

  • 4 tablespoon canola oil (1 tablespoon per person)
  • 1 onion Large onion chopped finely (¼ onion per person)
  • 2 cloves garlic peeled and minced (½ garlic clove per person)
  • 4 cups precooked japanese white rice (1 cup per person)
  • 1.5 pounds sukiyaki beef If you cannot find sukiyaki beef, you can use sirloin and freeze and then cut ultra thin
  • 1 teaspoon pepper (¼ teaspoon per person)
  • 1 cup corn (can use cooked fresh, frozen or even canned)- ¼ cup per person
  • 4 teaspoon butter (1 teaspoon per person) or margarine if you need to keep it dairy free.
  • 2 tablespoon green onions thinly sliced for garnish – optional


Instructions

  • Make the special honey brown sauce (Amakuchi). In a small pan add honey, soy sauce, oyster sauce mix and water. Cook over low heat for about 5 minutes and set aside.
  • Make the garlic soy sauce (Karakuchi). In a small pan add your oil and then add your garlic and just sauté until slightly aromatic then add the tamari (soy sauce) and pepper. Mix the cornstarch and water together to make a slurry and then slowly add to karakuchi sauce and cook until boils and slightly thickens. Set aside.
  • Make your Pepper Lunch Steak. In an iron skillet or a heavy duty pan, heat up your pan to a high heat, add your oil, onions and garlic and cook just until aromatic, add 1 cup of rice (per person) in the middle of the pan, then add the beef around the rice. sprinkle pepper on your beef, add the corn on top of rice and then place a dab of butter on top of your corn/rice mixture.
  • It is at this point that in the restaurant pepper lunch they would remove from the heat and serve to you. It is up to you but if you have 4 iron skillets and can get the pans super hot to cook the meat then by all means remove from the heat and serve. However, I only have one iron skillet, and only 3 burners and 3 regular pans and 4 mouths so feed.
  • For those of you that do not have an iron skillet or really like their beef more well done or even crispy then keep on cooking for a little bit (3-5 minutes) and turn over the beef and let the rice get a little crunchy on the bottom as that is my absolute favorite part.
  • Garnish your pepper lunch steak and rice sizzle with a little green onion and serve with both the delicious special honey brown sauce (Amakuchi) and garlic soy sauce (Karakuchi). Enjoy!
  • Bring the Japanese Pepper Lunch Beef Sizzle piping hot to the table in the iron skillet pan and set on an oven safe mitten. (Be Careful, it is VERY hot) Yummy served with edamame and Japanese pickles on the side. ITADAKIMASU! – Lets Eat!


Pepper Lunch Steak and Rice Sizzle

0
comments

May 08

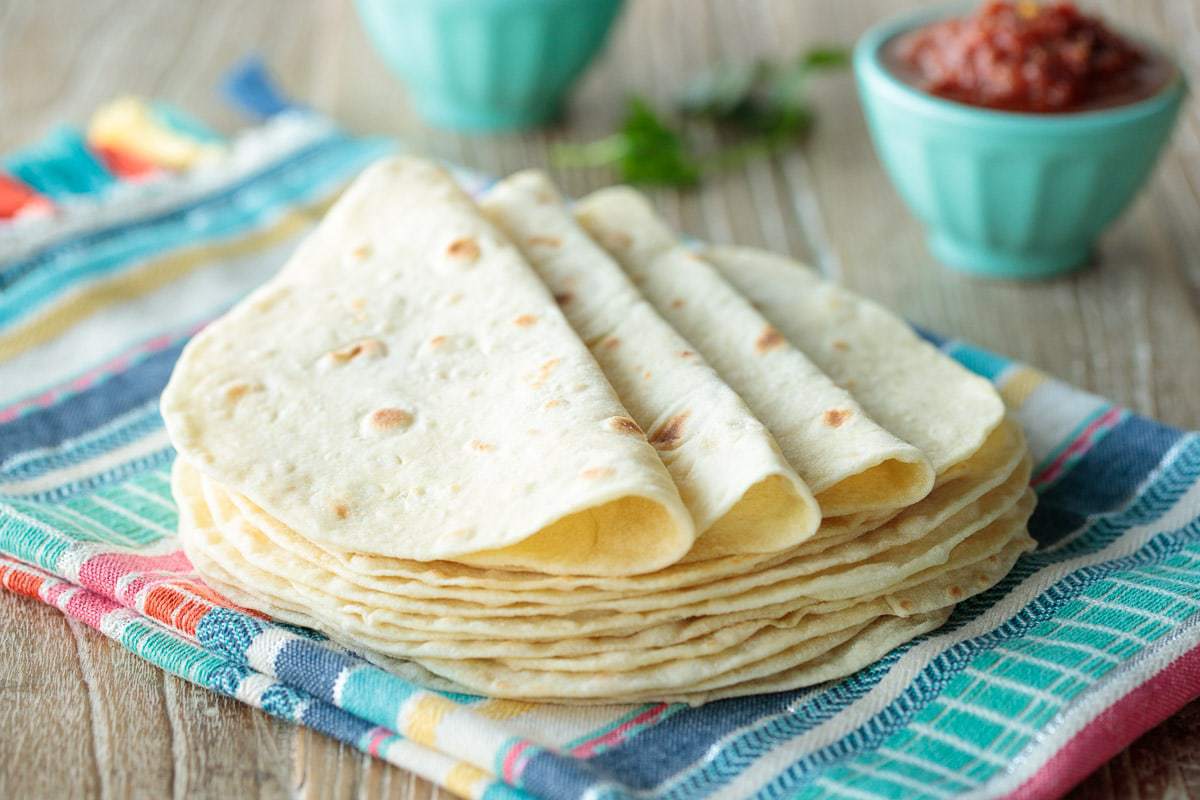
Homemade Flour Tortillas

MAKES: 16

Ingredients
  • 375 g all-purpose flour
  • 5 g salt
  • g baking powder
  • 80 ml extra virgin olive oil, vegetable oil or other fairly neutral flavored oil
  • 235 ml warm water


Instructions
To make by hand:
  1. Combine flour, salt and baking powder in a medium-size bowl. Using a sturdy silicone spatuala or a sturdy wooden spoon, mix dry ingredients until well combined.

  2. Make a well in the center of the dry ingredients and add the oil and water. Stir well from the bottom up, until all dry ingredients are incorporated and the dough begins to come together and form a shaggy ball.

  3. Turn dough out onto a lightly floured work surface and knead for 1-2 minutes until the dough is nice and smooth. Proceed with step number 3 below for the remainder of the recipe.

To make with a mixer:
    1. Combine flour, salt and baking powder in the bowl of a stand mixer. Using the dough hook, mix dry ingredients until well combined.

    2. Add oil and water with mixer running at a medium speed. After about 1 minute, or when mixture comes together and begins to form a ball, decrease mixing speed to low. Continue to mix for 1 minute or until dough is smooth.

    3. Transfer dough to a lightly floured work surface. Divide into 16 equal portions. Turn each piece to coat with flour. Form each piece into a ball and flatten with the palm of your hand. Cover flattened balls of dough with a clean kitchen towel and allow to rest for at least 15 minutes (or as much as 2 hours) before proceeding.

      4. After the rest period, heat a large pan over medium heat. Roll each dough piece into a rough circle, about 6-7 inches in diameter, keep work surface and rolling pin lightly floured. Don’t stack uncooked tortillas on top of each other or they will stick together. (I like to separate my tortillas with parchement paper.)

      5. When the pan is hot, place one dough circle into the pan and allow to cook 45 seconds to 1 minute or until the bottom surface has a few pale brown spots and the uncooked surface is bubbly. If browning too fast, reduce the heat a bit. If it’s taking longer than a minute to see a few pale golden brown spots on the underside of tortillas, increase the heat a bit. Flip to other side and cook for 15-20 seconds. The tortillas should be nice and soft but have a few small brown spots on the surface.

      6. Remove from pan with tongs and stack in a covered container or zippered bag to keep the tortillas soft.

      7. Serve warm or allow to cool for later use. When ready to use, place a slightly damp paper towel in the bottom of a microwave-safe container (with a cover) that will hold the stacked tortillas. Microwave uncovered for 15-30 seconds (start with 15) or until warm, then keep covered to hold heat while serving.

      8. Store in an airtight container or zippered bag at room temperature for 24 hours or refrigerate for up to 1 week. To freeze, separate tortillas with parchment paper or waxed paper and place in a zippered bag before placing in the freezer.


Best Ever Homemade Flour Tortillas

0
comments

May 08

Flapjacks (baking tin)

MAKES: 12


INGREDIENTS:

250g jumbo oats

125g butter

125g light brown sugar

2-3tbsp golden syrup

Optional chocolate chips


METHOD:

Pre heat oven to 180.

Lightly butter a 20*20 baking tin and set aside

Put the oats, butter, sugar and golden syrup in a bowl and mix well. Add the additional extra ingredients at this stage if used.

Spoon the mixture into the buttered baking tin and spread out evenly, pushing the mix into the corners.

Score through to make 12 squares.

Bake for around 15 mins until golden brown. Remove from the oven using gloves and allow to cool.

Once cooled, transfer to an airtight container and consume within 3 days.

0
comments