Jan 08

Millionaire’s ice cream bombe

Millionaire’s ice cream bombe

SERVES: 10-12

Ingredients

To serve

  • holly, to decorate (optional)
  • icing sugar, to serve (optional)


Method

  • STEP 1

    Line a 1.2-litre pudding bowl with a double layer of cling film, leaving plenty overhanging, and make a space for the bowl in the freezer. Put the biscuits in a food processor and blitz until they resemble fine crumbs. Add the butter and 2 tbsp caramel, and blend until well mixed. Save about 3 tbsp for the top and tip the rest into the lined pudding bowl. Use the back of a spoon to press evenly over the base and up the sides of the bowl. Freeze for 30 mins.

  • STEP 2

    Remove the chocolate ice cream from the freezer and allow it to soften at room temperature for 10 mins. Remove the pudding bowl from the freezer too (the biscuits should be firm by now.) Spoon the ice cream into the biscuit- lined bowl, packing it into the base. Spoon over the remaining caramel, spreading it to the biscuit walls. Return to the freezer for 30 mins.

  • STEP 3

    Remove the caramel ice cream and allow it to soften for 10 mins. Meanwhile, tip 75g chocolate coated malt balls into a bowl and lightly crush with the end of a rolling pin, leaving some chunky bits. Add the ice cream to the bowl and stir through the malt ball pieces – work quickly so the ice cream doesn’t melt too much. Remove the pudding bowl from the freezer and tip in the malt ball ice cream, spreading it to completely fill the bowl, then level the top. Scatter with the remaining biscuit crumbs. Return to the freezer for at least 4 hrs (or for up to 2 weeks).

  • STEP 4

    Put the cream in a pan and heat until steaming hot but not boiling. Put the chocolate in a large bowl and pour over the cream. Leave to stand for 1-2 mins, then stir to make a smooth ganache. Set aside to cool until the sauce thickens to a spreadable consistency (you can speed this up by putting it in the fridge, but remember to stir it every 5-10 mins or it will set around the edges).

  • STEP 5

    Remove the pudding bowl from the freezer. Turn it onto a plate and remove the bowl and cling film. Spread half the chocolate ganache all over the pudding and, as quickly as you can, stick the remaining chocolate coated malt balls all over the surface – this is easiest if you start around the bottom and work your way up in layers. The chocolate ganache will start to set, so use a little more from the bowl to make the malt balls stick. Once covered, return to the freezer for at least a further 4 hrs (or for up to 3 days), removing it 10 mins before serving. Top with a dusting of icing sugar and a sprig of holly, if you like.


https://www.bbcgoodfood.com/recipes/millionaires-ice-cream-bombe

0
comments

Jan 08

Rocky road cheesecake pudding

Rocky road cheesecake pudding with sparklers in the top

SERVES: 10


Ingredients

For the cheesecake filling

For the rocky road


Method

  • STEP 1

    Line a 2 litre pudding bowl with cling film, leaving some overhanging to cover the top later. Thinly slice the cakes lengthways (8-9 slices per cake) and use the slices to line the base and sides of the bowl, making sure there are no gaps.

  • STEP 2

    Mix the ingredients for the filling with an electric hand whisk until thick and smooth. Fill the lined bowl with it, leaving some space for the rocky road to go on. Set aside.

  • STEP 3

    Break the chocolate for the rocky road into pieces in a heatproof bowl. Add the butter and golden syrup. Set over a pan of simmering water and leave for a few mins until melted – turn the heat off if the water boils, the residual heat will be enough to melt it. Stir until smooth and glossy.

  • STEP 4

    Tip the biscuits into a food bag and crush to a rubble with a rolling pin, creating some fine crumbs and some bigger pieces. Tip into the chocolate mix with the pretzel pieces and marshmallows. Mix until everything is coated in chocolate. Spoon it all over the cheesecake, covering the surface. Wrap the bowl in cling film and place a plate on top with a can to weigh it down. Chill for at least 24 hrs, or up to three days.

  • STEP 5

    Decorate the cheesecake on the day you want to serve it. Heat the cream, chocolate and golden syrup in a pan over a low-medium heat until the chocolate has melted and you have a pourable mixture – don’t let it boil. Unwrap the cheesecake and turn onto a wire rack with a tray underneath. Pour over the chocolate glaze to cover the entire cake. When it stops dripping, use a fish slice to transfer to a plate. Chill until the glaze has set (about 10 mins).

  • STEP 6

    Meanwhile, melt the white chocolate in shorts bursts in the microwave. Drizzle it over the top of the cake, then decorate as you like. We used edible glitter, gold sprinkles and chocolate truffles.


https://www.bbcgoodfood.com/recipes/rocky-road-cheesecake-pudding

0
comments

Jan 08

One-pot minestrone soup (improve your lifespan)

Minestrone soup.


Ingredients

  • Carrot
  • Celery
  • Onion
  • Potato
  • Seasonings
  • Garlic
  • Crushed tomatoes
  • Broth
  • Beans
  • Pasta or barley
  • Basil


Method

  1. Start by dicing all the ingredients and getting your work station ready.
  2. Heat a large soup pot over medium heat. Saute the garlic and onion with a couple of tablespoons of water for about three minutes.
  3. Next, add carrot, celery, potato, oregano, salt and pepper. Keep cooking for five to six minutes until the potato and carrot have softened slightly.
  4. Finally, pour in vegetable broth and empty the cans of tomatoes and chickpeas into the pot. Add the pasta and bring the contents to a boil.
  5. Turn down the heat to a simmer and cook your minestrone soup uncovered for 12 to 15 minutes. Garnish with fresh parsley and enjoy!


https://www.dailyrecord.co.uk/news/health/doctor-hails-soup-recipe-worlds-31770261

0
comments

Jan 08

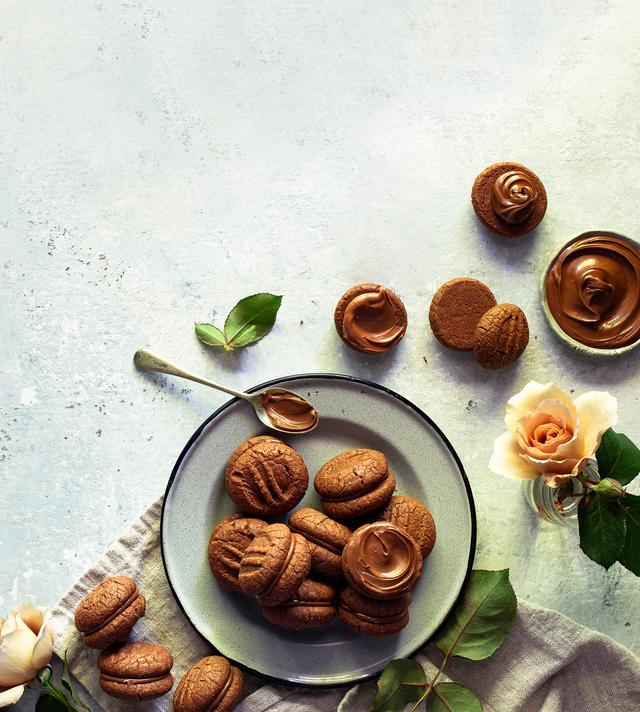
Chocolate Hazelnut Melting Moments

MAKES: 12-14 biscuits

INGREDIENTS

  • 50g roasted hazelnuts, skins removed
  • 125g unsalted butter, softened
  • 60g icing sugar
  • 1 teaspoon vanilla bean paste
  • 100g gluten-free custard powder
  • 2 tablespoons Dutch cocoa powder
  • 80g fine white rice flour
  • 2 tablespoons tapioca flour
  • Pinch of salt
  • 150g chocolate hazelnut spread

METHOD

  • Preheat oven to 150°C (fan-forced) and line two baking trays with baking paper. Place hazelnuts into a small food processor and blitz until fine. Set aside.
  • In the bowl of a stand mixer, cream the butter, icing sugar and vanilla until light and fluffy. In a separate bowl, combine custard powder, cocoa, rice flour, tapioca flour, ground hazelnuts and salt; whisk well. Add flour mixture to the creamed butter; blend until the dough comes together.
  • Use your hands to roll teaspoonfuls of dough into balls and place onto prepared trays, leaving space between biscuits as they will spread when cooking. Use a fork to flatten biscuits slightly. Bake in the oven for 18-20 minutes. When cooked, biscuits will have formed a crust but will still be slightly soft to the touch – they will firm up as they cool. Allow biscuits to cool completely on trays before sandwiching together with a spoonful of chocolate hazelnut spread.
  • These Melting Moments are wonderful eaten the day they’re made, but will keep in an airtight container at room temperature for 3-4 days.


https://www.homestolove.com.au/melting-moments-25434

0
comments

Dec 08

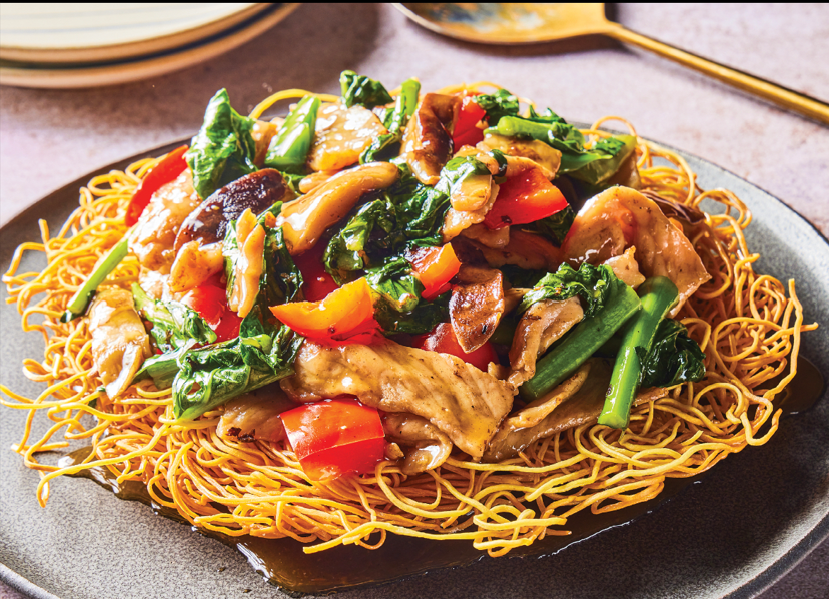
Crispy Fried Noodles

1 (8-ounce) boneless pork chop, ¾ to 1 inch thick, trimmed of all visible fat

6 ounces gai lan, stalks trimmed

¼teaspoon baking soda

4 teaspoons Shaoxing wine, divided

1 tablespoon soy sauce, divided

2½tablespoons cornstarch

2 tablespoons oyster sauce

1½tablespoons fish sauce

1 tablespoon sugar

1 teaspoon toasted sesame oil

¼teaspoon white pepper

6 ounces shiitake mushrooms, stemmed and sliced ½ inch thick

1 red bell pepper, stemmed, seeded, and cut into ¾-inch pieces

6 ounces fresh or thawed frozen Hong Kong–style noodles

2½cups vegetable oil for frying

2 scallions, cut into 1½-inch pieces

2 teaspoons grated fresh ginger

1⅔ cups chicken broth


1. Place pork chop on plate and freeze until very firm, about 20 minutes. While pork freezes, prepare gai lan. Remove leaves, small stems, and florets from stalks; slice leaves crosswise into 1½-inch strips (any florets and stems can go into pile with leaves); and cut stalks on bias into ¼-inch-thick pieces. Set aside.

2. Stir 1 tablespoon water and baking soda together in medium bowl. When pork is firm, use sharp knife to shave pork crosswise as thin as possible. (Slices needn’t be perfectly intact.) Transfer to bowl with baking soda mixture and toss until well coated. Add 1 teaspoon Shaoxing wine and 2 teaspoons soy sauce and toss to combine. Set aside.

3. Bring 4 quarts water to boil in large pot. While water heats, stir cornstarch and ¼ cup water together in small bowl. Stir oyster sauce, fish sauce, sugar, sesame oil, white pepper, and remaining 1 teaspoon soy sauce together in separate bowl.

4. Add mushrooms to boiling water and cook until tender and pliant, about 30 seconds. Using spider skimmer or slotted spoon, transfer mushrooms to bowl. Return water to boil. Add bell pepper and cook until crisp-tender, about 30 seconds. Using spider skimmer, transfer bell pepper to second bowl. Return water to boil. Add gai lan and cook until stems are crisp-tender, about 1 minute. Using spider skimmer, transfer gai lan to bowl with bell pepper. (Vegetables can be blanched 24 hours ahead.)

5. Return water to boil. Add noodles and cook, stirring often, until almost tender (center of noodles should be firm with slight opaque dot), 45 to 90 seconds. Drain noodles in colander and rinse under cold running water, tossing with tongs, until cool to touch, about 1 minute. Drain noodles very well.

6. Line large serving plate with triple layer of paper towels. Add oil to wok until it measures about ¾ inch deep and heat over medium-high heat to 350 degrees. (If using skillet, add oil until it measures ¼ inch deep, about 1¼ cups.) Carefully lower noodles into oil (oil will bubble vigorously; do not use colander to tip noodles into oil). Using spatula, spread noodles into even layer. Fry until outer 2 inches of noodle disk are crisp and lightly browned, 3 to 5 minutes, occasionally rotating disk for even crisping. Using 2 thin spatulas, transfer noodle disk to prepared plate. Carefully pour off oil from wok into bowl. Reserve 1 tablespoon oil (reserve remaining oil for other use) and wipe out wok. Leaving noodle disk on plate, remove and discard paper towels. Pour off any excess water from cooked bell pepper and gai lan.

7. Heat now-empty wok over medium heat until smoking. Add 1½ teaspoons reserved oil, scallions, and ginger and cook, stirring constantly, until fragrant, about 15 seconds. Increase heat to high and add pork. Cook, stirring constantly, until pork is no longer pink, 1 to 2 minutes. Transfer to bowl with bell pepper and gai lan.

8. Add remaining 1½ teaspoons reserved oil and mushrooms to now-empty wok and cook, stirring constantly, until mushrooms have shrunken slightly, about 2 minutes. Add remaining 1 tablespoon Shaoxing wine and cook, stirring constantly, until no liquid remains in wok, about 15 seconds. Add oyster sauce mixture and cook, stirring constantly, until bubbling, about 15 seconds.

9. Add chicken broth, pork, and vegetables and bring to simmer. Stir cornstarch mixture to recombine; add to wok; and cook, stirring constantly, until sauce is thick and translucent, about 1 minute. Spoon pork and vegetables over noodles and serve immediately. At the table, use large spoon to cut through noodles; scoop noodles and stir-fry onto individual serving plates.

0
comments

Dec 08

Gluten-free shortbread

A board and two plates of shortbread biscuits next to a tea towel and cup of tea

SERVES: 15

Ingredients

  • 120g unsalted butter, softened
  • 70g golden caster sugar, plus extra for dusting
  • 1 tsp vanilla extract
  • 120g gluten-free flour, plus extra for cutting
  • 60g cornflour or arrowroot


Method

  • STEP 1

    Heat the oven to 180C/160C fan/gas 4. Cream together the butter, sugar and vanilla in a bowl until light and fluffy. Sift the flour, cornflour or arrowroot and a pinch of salt into the bowl, then fold into the butter mixture until it forms a soft dough.

  • STEP 2

    Roll out the dough on a lightly floured worksurface until roughly 4mm thick. Cut out the biscuit shapes using a lightly floured 7½cm round cutter. Put the dough rounds on a lined baking tray, about ½ inch apart, then sprinkle with a light dusting of sugar. Bake for 15 mins or until lightly golden. Allow to cool then serve. The shortbread can be stored in an airtight container for up to two weeks.

  • STEP 3

    Alternatively, to make shortbread fingers, press the dough into a lined square tin (we used 23cm x 23cm). Chill for at least 1 hr (or up to a day). When ready, bake for 30 mins until the shortbread is lightly golden and cooked through. Allow to cool for 2-3 mins, then carefully remove from the pan and cut into fingers.


https://www.olivemagazine.com/recipes/baking-and-desserts/gluten-free-shortbread/

0
comments

Dec 08

Gluten-free gingerbread

A tin of iced gingerbread biscuits

MAKES: 20 x 7cm stars (350g gingerbread)


Ingredients

  • 70g golden syrup
  • 1 orange, zested
  • 100g soft dark brown sugar
  • 100g unsalted butter, cubed
  • 1 tbsp ground ginger
  • 2 tsp ground cinnamon
  • ½ tsp bicarbonate of soda
  • 1 egg, lightly beaten
  • 250g plain gluten-free flour, plus extra for dusting
  • 1 tsp xanthan gum
  • 100g icing sugar (optional)

Method

  • STEP 1

    Put the golden syrup, orange zest, sugar, butter, ginger and cinnamon into a large pan over a medium heat for 5 mins, stirring occasionally, until the butter has melted and the sugar has dissolved, taking care not to bring the mixture to a rolling boil. Remove from the heat, add the bicarbonate of soda and stir to combine. Leave to cool for 5 mins, then mix in the egg before sifting over the flour and xanthan gum. Beat with a wooden spoon until you have a smooth, glossy dough. It will be quite soft at this point, so leave to firm up in the pan for 10 mins, before shaping into a disc, wrapping in baking paper and chilling in the fridge for 1 hr or until firm enough to roll.

  • STEP 2

    Heat the oven to 190C/170C fan/gas 5. Line two large baking trays with baking paper.

  • STEP 3

    Lightly dust a clean worksurface with flour and roll out the dough to 5mm thick. Cut the dough into festive shapes using a cutter of your choice, then arrange on the lined baking trays, evenly spaced apart. Re-roll until the dough is used up. Bake for 10-12 mins or until evenly golden. Cool fully on the baking tray. To make the icing, mix 100g of icing sugar with 1-2 tbsp of water until smooth. Spoon into a piping bag and pipe onto the cooled biscuits or dust with icing sugar, if you like.


https://www.olivemagazine.com/recipes/baking-and-desserts/gluten-free-gingerbread/

0
comments

Dec 08

Gluten-free biscuits

Gluten-free biscuits on a wire rack and on a plate with a coffee

MAKES: 38

Ingredients

  • 150g unsalted butter, softened
  • 130g golden caster sugar
  • 1 tbsp vanilla extract
  • 1 tbsp golden syrup
  • 150g gluten-free oats
  • 150g gluten-free plain flour
  • 1 tsp gluten-free baking powder
  • 1 tsp xanthan gum
  • 1 tsp ground cinnamon (optional)


Method

  • STEP 1

    Heat the oven to 180C/160C fan/gas 4. Put the butter, sugar and vanilla in a bowl, and cream together until light and fluffy. Add golden syrup and mix well. Stir together the remaining dry ingredients, plus a pinch of salt, in another bowl. Add the creamed mixture to the dry and fold together until thoroughly combined.

  • STEP 2

    Tip the dough onto a lightly floured worksurface. Use your hands to divide and roll the dough into 38 balls, roughly the size of golf balls. Put on two baking trays lined with baking paper and gently flatten with your palm to make a round shape – make sure to leave about ½ inch between biscuits. Bake for 10-12 mins or until golden. Leave to cool on the tray for 15 mins before removing. The biscuits can be stored in an airtight container for up to two weeks.


https://www.olivemagazine.com/recipes/baking-and-desserts/gluten-free-biscuits/

0
comments

Dec 08

Gluten-free scones

Gluten free scones_Becky Excell

MAKES: 8


Ingredients

  • 340g gluten-free self-raising flour, plus extra for dusting
  • 1 tsp gluten-free baking powder
  • ¼ tsp xanthan gum
  • 85g butter
  • 50g caster sugar
  • 3 tsp lemon juice
  • 1½ tsp vanilla extract
  • 175ml milk
  • 1 egg
  • a handful (optional) sultanas
  • to serve jam and clotted cream


Method

  • STEP 1

    Preheat the oven to 220C/fan 200C/gas 7. Prepare a baking sheet with baking paper.

  • STEP 2

    Put the gluten-free flour, baking powder and xanthan gum in a bowl. Chop the butter into cubes and add to the flour. Rub it in with your fingers until it forms what looks like breadcrumbs. Stir in the sugar and sultanas, if using.

  • STEP 3

    Add the lemon juice and vanilla extract to the milk. Allow to sit for about 5 minutes to make your own homemade buttermilk.

  • STEP 4

    Place the baking sheet in the oven whilst you make the scones. It helps if the baking sheet is hot when you place the scones on top of it.

  • STEP 5

    Pour in the homemade buttermilk and work it in using a metal spoon. Keep working until it forms a dough (it might be a little sticky).

  • STEP 6

    Flour your work surface and your hands, using extra gluten-free flour. Tip the dough on to the work surface and fold it over a few times to bring the dough together. It’s really important not to overwork the dough, or you will get tough, flat scones. Bring the dough into a rounded shape about 4cm-4.5cm thick. The taller, the better.

  • STEP 7

    Using a cutter (about 45mm to 55mm wide), push down into the dough to make rounds. Ease out of the cutter and put to one side until you have used up all the dough (keep re-rounding the dough, but remember not to overwork it). Brush the tops of the scones with beaten egg.

  • STEP 8

    Place the scones onto the hot baking sheet and bake for 12-15 minutes, or until golden on top and golden on the base. Serve up warm with whatever you fancy, such as jam and clotted cream. You can warm them up later, eat them cold, or even freeze.


https://www.olivemagazine.com/recipes/baking-and-desserts/gluten-free-scones/

0
comments

Dec 08

Gluten-free banana bread

A loaf of banana bread with a banana baked into the top, on a white plate

SERVES: 8


Ingredients

  • 30g vegetable oil, plus extra for the tin
  • 120g plain white gluten-free flour
  • 100g ground almonds
  • 2 tsp bicarbonate of soda
  • 1½ tsp mixed spice
  • 4 bananas
  • 80g runny honey, plus 1 tbsp
  • 2 eggs
  • 1 tsp vanilla extract
  • 50g walnuts, chopped


Method

  • STEP 1

    Heat the oven to 180C/fan 160C/gas 4. Oil a 900g loaf tin and line with baking paper. In a large bowl, combine the flour, ground almonds, bicarbonate of soda, mixed spice and ½ tsp of salt. Peel and mash three of the bananas in another large bowl, then add the oil, 80g of honey, the eggs and vanilla extract, and whisk to combine.

  • STEP 2

    Fold the dry ingredients into the wet, being careful not to over-mix – a few lumps are fine. Fold in the walnuts until just combined, then pour the batter into the prepared tin and level the surface. Peel and slice the remaining banana in half lengthwise and arrange on top. Bake for 40-45 minutes or until the top of the loaf is deeply golden and a skewer inserted into the middle comes out clean. Immediately brush with the remaining honey while the loaf is still hot, then cool in the tin for 10 minutes before lifting onto a wire rack to cool completely.


https://www.olivemagazine.com/recipes/baking-and-desserts/gluten-free-banana-bread/

0
comments